Progress...
Heat pump installation
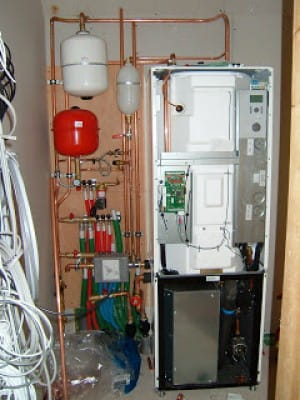
Work started on installing our heat pump last week. We have specified a Nibe 1240-5kW - the smallest capacity they make - with integral 'tank-in-tank' hot water cylinder. It 's a very neat unit, being the same size as a 1.9m tall fridge freezer. The pipework next to it will be ultimately enclosed in a cupboard which will still have some storage space at the front, whilst allowing access to the pipes at the back if need be.
Specifying a heat pump uses the opposite logic to specifiying a combustion boiler, as it must be just undersized to operate at its most efficient when taking into account the building's heat loss and anticipated peak heat requirement. The reason for this is that heat pumps dislike being 'cycled' - switched on and off - and actually benefit from running for longer periods at a time than conventional boilers. In extreme circumstances where, say, there is significant heat and hot water demand (eg. Christmas with visitors!) then the heat pump employs an electrical element to supplement itself, but the trick is to set things up so this hardly needs to be used at all, electricity being a relatively high-carbon form of energy.
The unit is being installed in our utility room where all the pipes from the ground loop, hot and cold water, underfloor heating and 1st floor radiators/towel radiators terminate. The guys are making a neat job of connecting this spaghetti together and hopefully by late next week we should be in good shape to switch on and get some heat into the 40 tonnes or so of concrete which forms the floor slab.
As it happens one of the founders of the heat pump supply company - Ecoliving - popped round yesterday to look at our windows (he's building an extension to his own house!) and he told me that the heat pump even had a setting to dry the floor slab out over a four day cycle, this will be important before we fit engineered board flooring.
Anderson Floor Warming of Glasgow are doing all of the plumbing in the house using a German plastic/aluminium pipe system. Hot and cold feeds are fed to manifolds from which each tap is fed, thus reducing pipe runs. Also the hot water feed is circulated from and back to the hot water tank at peak use periods (controlled by a timer) such that when a hot tap is switched on, hot water appears almost instantly.
Apart from the plumbers, the rest of the guys on site have never built a house with a heat pump in it and we are all waiting in anticipation for switch on!


Brochure management..!
Now we're on a mission to make sure we're ahead of the game on 'client supply items', we're starting to get rid of the accumulation of brochures as we actually bite the bullet and start buying stuff!
So far we've bought the sanitaryware for the three bathrooms, external insulaton system, chosen the wood stove and heat pump, and ordered and fitted all windows and doors - all of which we separated from the main build contract to retain maximum freedom of choice. Today our fridge freezer was delivered (Liebherr A+ rated) marking the first delivery of kitchen items.
The focus now is on the overall kitchen as Debs mentioned in her last blog, with Magnet and John Lewis very much in the running and we should have costed designs from both by the end of this week.
With regard to the overall build program, the joiners we're back last Friday fitting the internal airtightness/vapour membrane and tomorrow we should have a full crew including the slaters who probably have around two weeks of work to do in order to complete the roof. That said, we have snow and gales forecast tonight which might make roofing work a little tricky in the morning!
Not quite wind and watertight after Christmas...!
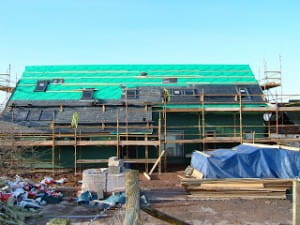
On our return from Christmas with family down south it was clear that the house had taken some battering during the short festive break. The area and our exposed site had been hit by severe gales on Boxing Day, resulting in significant areas of roof and wall breather membrane being literally torn off.
This was probably no big surprise with regard to the wall, as the breather membrane is simply stapled to the Pavatherm boards which don't have much hold being a lightly compressed wood fibe board.
The roof membrane was a different matter however, this being fixed down temporarily with 3"x 2" battens nailed every couple of feet. Despite being mechanically trapped by the batten and spiked with nails, this was simply not enough to avoid being torn from beneath the battens to expose the sarking board again, by now drying out and shrinking to reveal the (intended) ventilation gaps between the butt joints. As a result, the inside of the house is soaked again!
I left a message with our joiner to let him know, who dutifully showed up a couple of hours later in the middle of his holidays to fix the damage in the dark just in time before the next downpour!

1st Insulation arrives
Today we took delivery of the first batch of insulation - 140mm Rockwool Flexi for the walls. Tomorrow we expect the 60mm woodfibre board - 'Pavatherm Plus' - to be delivered, which will be used as an outer cladding to the timber frame walls. This is where we depart from conventional timber frame construction where the cladding adds additional insulation and reduces 'thermal bridging' through the timber studs in the frame.
The wall design is based on a detail developed for timber frame buildings by the AECB to meet their Silver standard for energy efficiency and we will add detail drawings alongside photos when the insulation is fitted.
Winter sun, first snow...

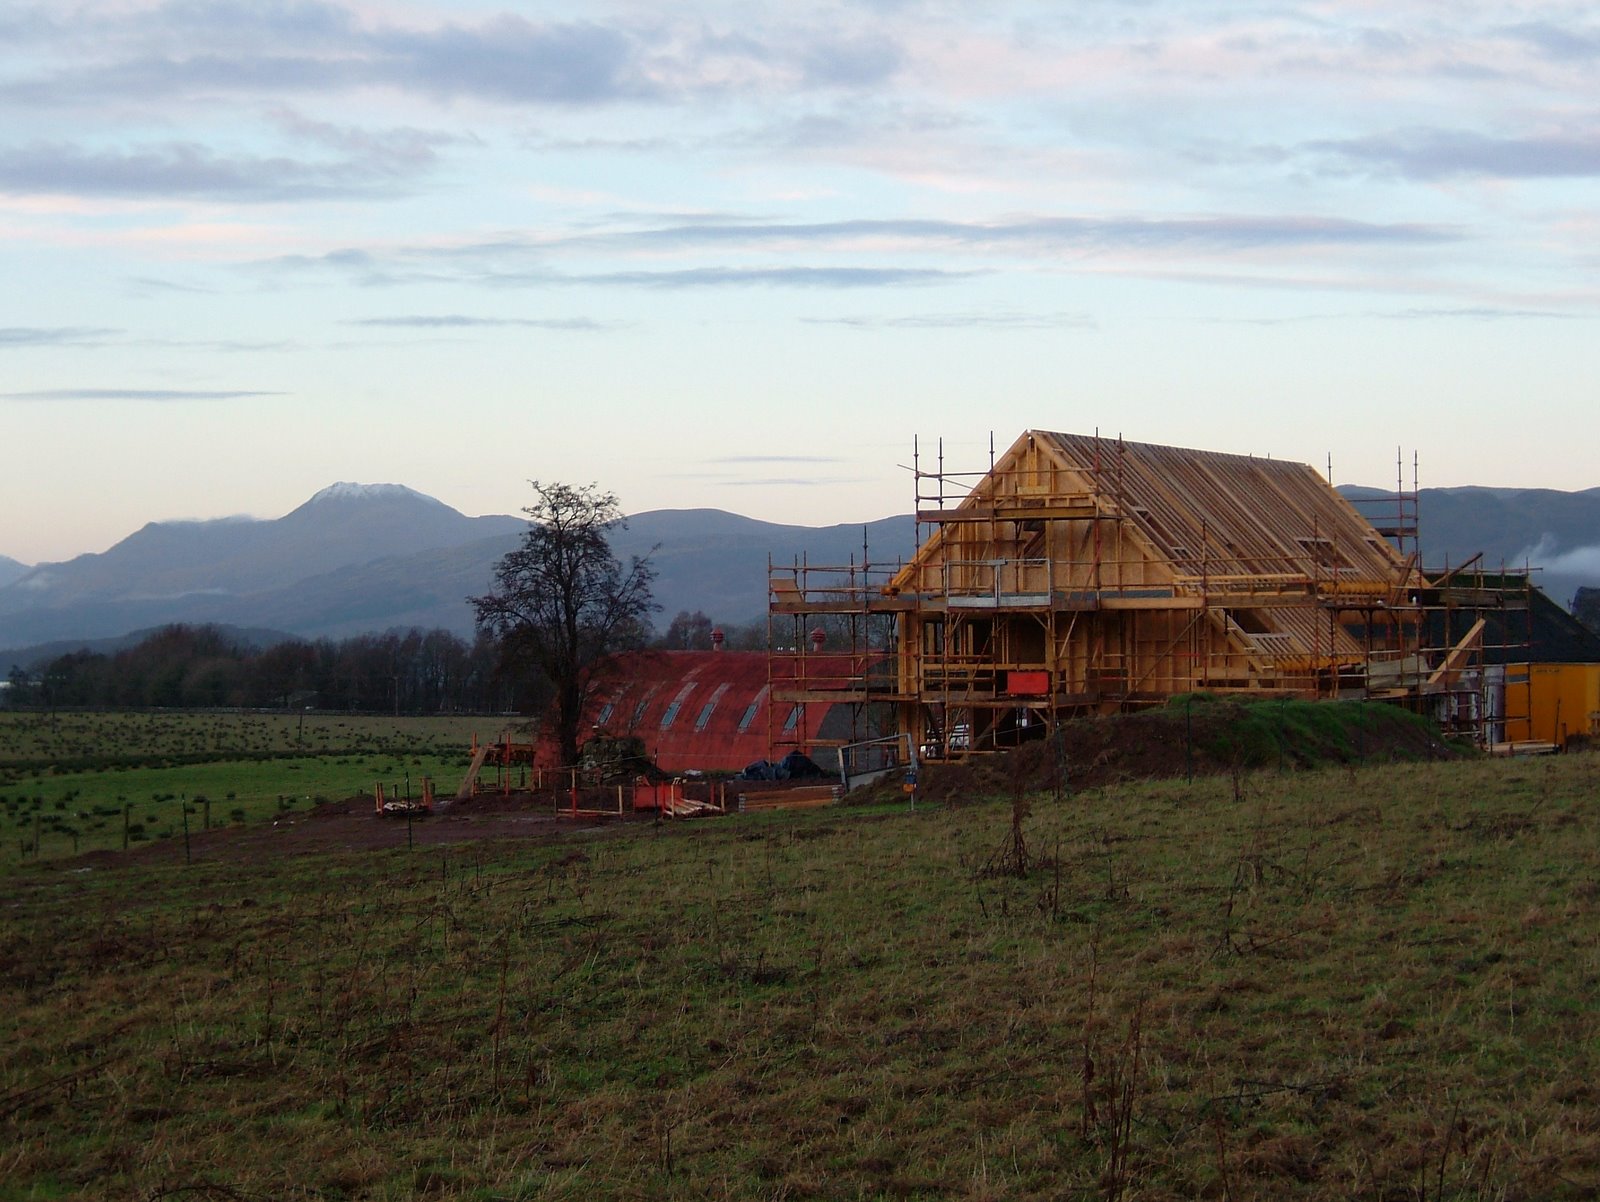
It was a chilly, raw weekend, and we certainly felt it in the caravan! I just couldn't get my feet warm the whole weekend, so on Sunday afternoon took a stroll around the fields to capture progress 'from a distance' on ECF2 after so much time focussing on the nitty gritty detail.
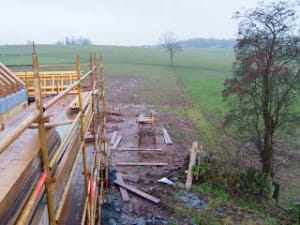
By close of play last Friday - 2hrs after this photo was taken - the ridge beam and both gable walls were complete. During the couple of days prior to this, by quirk of structural engineering design the first floor boarding was glued and nailed in place, the idea being to provide a strong joint between the 1st floor I-beam joists and the binder plate (a deep beam which runs along the top of the ground floor wall panels against which the ends of the joists are butted).
In my (and our joiner's!) view this was quite an unusual detail, but a call to our stuctural engineer - "just to make sure..." - clarified the thinking behind it. The downside was that the T&G chipboard flooring had to be protected from the weather until the building is made watertight, as being merely 'moisture resistant' isn't exactly a qualification for survivablity for up to a month's battering by the west of Scotland's climate in November!This coming week should see the completon of the 1st floor wall panels and start of work on the roof. On the 'goods inwards' front, the windows are due to be delivered this week and possibly the Pavatherm wood fibre insulating cladding board.


Portal frame arrives

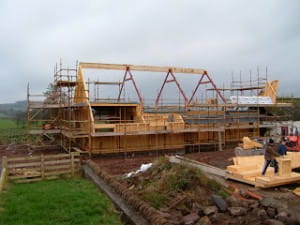
Late afternoon yesterday saw the arrival of the prefabricated portal frames along with the brackets and bits to put them together. These are more than a week overdue and their late arrival has meant a temporary stop on site for a few days as nothing further could be done without them beyond the ground floor panels which are now in place .
However, things moved along again today as our main builder/project manager and two joiners started to the erect this steel framework into the gound floor panels. By the end of the day two of the three frames were in place and secured.
So why a portal frame? Well, this 1.5 storey house is very open plan internally with generous internal room heights (2.7m ground floor, 3.5m kitchen/diner, 2.9m first floor) such that the upper floor ceilings follow the roof line almost to the ridge, with a small loft space around 1.5m high. With this internal design it was tricky to use a (more conventional) truss system, so the portal frame is used to provide torsional stiffness to the building and carry a roof ridge beam, against which rafters will be supported for the roof. In effect, this is a contemporary take on a traditional method of roof construction.
In designing the roof we have also avoided the use of roof purlins (horizontal rafter supports) by using timber 'I-beams', each of which will span around 5m from eaves to ridge at a 45 deg. pitch and carry the weight of the slate roof supported only at either end. This not only keeps the internal structure clean and uncluttered, but their 352mm depth will be fully filled with insulation and their thin shear web minimises thermal bridging. The end result is a stiff, clean, super-insulated roof structure.
The down side to this constrcution has been additional labour/time and ultimately cost, but the end result should be worthwhile.
Wall plates installed
On Tuesday of this week the builders spent the morning fitting the wall plates (also called 'sole plates'). In timber frame construction these set out the plan of the ground floor layout and form the interface between the walls (both external and internal) and the ground floor slab/foundations.
The wall plates comprise timber of the same width dimension of the wall panels they support (ie. 140mm and 89mm), and are simply cut to length and laid on a bed of mortar (and damp proof course at the outside walls).
Whilst an apparently straightforward process, locating the wall plates in the correct positions is critical to the ultimate accuracy of the frame installation.
As an aside, this process also introduced a simple but effective airtightness detail to the building, in that the overhanging damp proof membrane (from under the slab) is folded back over the slab at the edges for later trimming and connection to the vapour membrane to be installed on the inside of the wall panels. Whilst not an essential detail (and usually omitted), this ensures an airtight and flexible linear floor/wall joint that should last through the first few years of the building 'settling' and drying out, a process often responsible for significant degradation of airtighness as cracks open between differing materials (eg wood/mortar) and thus worsening energy efficiency. Polythene membrane, being a flexible material, withstands this movement.
As an aside, airtightness is a key component to low energy building design alongside insulation, the minimisation of thermal bridges, orientation and glazing. Coupled with this it is essential to have an effective ventilation system to ensure good air quality inside - more on this and other airtighness details as the house takes shape.
All quiet on site...
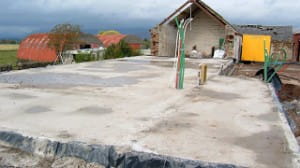 It's now two weeks since the floor slab was poured with most of the ground floor plumbing and underfloor heating pipes in-situ. The planning and preparation work appears to have paid off as overnight rain reveals little ponding of water indicating we have a flat and level slab within the specified tolerance. All services are also now in place within the slab, having been 'introduced' to the inside of the building via pipework and ducts, with just the soil pipes to be revealed by tapping away the few mm of concrete over their sealing caps. Little has happened since on site with the exception of the delivery of the timber frame sole plate material to be fitted in readiness for the main house frame, this being schduled for delivery w/c 29th October, although there has been much 'to-ing' and 'fro-ing' between frame supplier, builder, architect and client (us!) over minor changes to dimensions of components and materials. In the meantime, we've put some more effort into landscaping works and have started to plant up behind the drystone faced retaining wall, this being almost complete bar coping stones (proving quite hard to come by!).
Day 11...
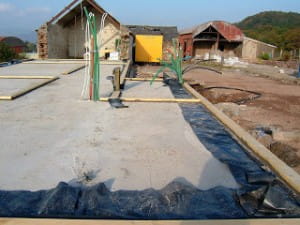
Since Debs' post this morning, by the time the crew left at the end of the working day the hardcore and type 1 material was in with sand blinding on top ready for the insulation to be installed. This point marks the first departure from conventionality, as the next stage is to install 200mm of polystyrene insulation ready for the 20 tonnes of concrete slab to be poured on top of it.
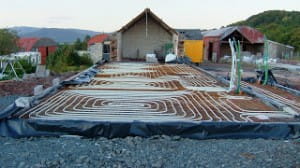
Usual practice is to pour the slab at this stage, then insulate it and pour 50-70mm of screed on top within which the underfloor heating pipes are installed. We're cutting out the screed and going for a single pour of 150mm, which will will also contain the underfloor heating pipes within this massive slab.
Drainage
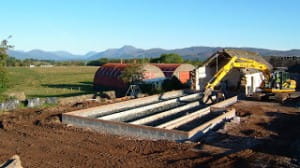
Work today is concentrating on getting the drainage in place, notably for surface and rain water as the foul drainage is already in place from the edge of the previous house to the septic tank.
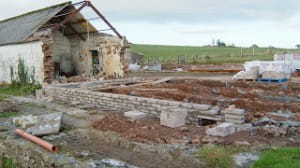 With concrete founds set and sight lines re-established, work starts on the dwarf walls which will support the slab. We had good dry weather today and good progress was made.
Search and book
Tags
animals architectural design awards, cottages, sustainability bees caravan cottages Curlew Cottage days out design dogs eastcambusmoon electric vehicles foundation fruit and veg production furniture gold award great review green toursim hard landscaping heat pump heat recovery hens holiday accommodation insulation interiors lambing landscaping loch lomond low energy measures national park nature outings owls people photoshoot roof solar PV timber frame Training ventilation walks website windows
Blog archive
- June 2019 (1 entry)
- February 2019 (1 entry)
- December 2018 (1 entry)
- November 2018 (1 entry)
- April 2018 (1 entry)
- December 2017 (1 entry)
- October 2017 (2 entries)
- June 2017 (1 entry)
- April 2017 (2 entries)
- March 2017 (1 entry)
- February 2017 (1 entry)
- February 2016 (1 entry)
- June 2014 (1 entry)
- June 2013 (1 entry)
- April 2013 (1 entry)
- February 2013 (1 entry)
- May 2012 (2 entries)
- April 2012 (1 entry)
- March 2012 (2 entries)
- December 2011 (1 entry)
- August 2011 (2 entries)
- June 2011 (4 entries)
- May 2011 (4 entries)
- April 2011 (1 entry)
- December 2010 (4 entries)
- October 2010 (2 entries)
- August 2010 (2 entries)
- December 2009 (1 entry)
- November 2009 (2 entries)
- October 2009 (2 entries)
- September 2009 (3 entries)
- August 2009 (1 entry)
- July 2009 (2 entries)
- June 2009 (3 entries)
- May 2009 (7 entries)
- April 2009 (2 entries)
- March 2009 (2 entries)
- February 2009 (1 entry)
- January 2009 (4 entries)
- December 2008 (2 entries)
- November 2008 (1 entry)
- June 2008 (5 entries)
- May 2008 (4 entries)
- April 2008 (11 entries)
- March 2008 (14 entries)
- February 2008 (9 entries)
- January 2008 (12 entries)
- December 2007 (11 entries)
- November 2007 (11 entries)
- October 2007 (10 entries)
- September 2007 (6 entries)
