Heat Pump: Part 1 - ground loop

As previously mentioned we have opted to use a ground source heat pump to provide both space and hot water heating. With no mains gas, an adjacent field and the opportunity to design a well insulated house from scratch with underfloor heating, the heat pump was the lowest carbon and lowest running cost option for East Cambusmoon.
For anyone considering a heat pump for their own house there aren't that many situations where it is the most cost effective and efficient choice, and certainly if you have the luxury of a mains gas supply a high efficiency gas boiler, coupled with say solar thermal panels will likely be a lower capital cost and running cost option than a heat pump doing both. If not on mains gas, then the costs need to be compared to LPG or oil and the decision will largely depend on the type of heating distribution system you already have, ie. radiators or underfloor heating. For the same heat input to a room, radiators need to be run at a higher temperature than underfloor heating simply because the heat emitter is concentrated into a relatively small wall hung panel, rather than the entire surface area of the floor. The problem with heat pumps is that their efficiency rapidly decreases in proportion to the heating medium temperature, such that running small radiaors from a heat pump is a bad idea. This can be alleviated to a certain extend by increasing the size of radiators so they can be run at a lower temperature.
Then there's the heat collection system, in our case this being a 300m length of 40mm diameter pipe buried 1.4m underground. This particular aspect of our build was a separate 'client item' from the main build contract so Debs, me, Stewart the digger driver and £60k's worth of band new JCB set to for four days of hard graft to get this pipe buried in the ground to in such a way as to absolutely maximise every joule of energy that could be sucked out of it .....which of course would be continuously be replenished by the sun. In effect, a huge solar panel!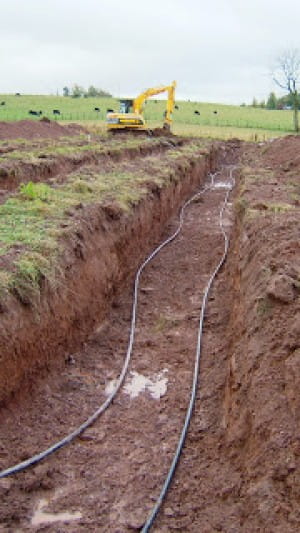 In designing the collector system, we followed the heat pump manufacturer's (http://www.nibe.com/) advice on pipe depth, separaton and layout. Our supplier (http://www.ecoliving.info/) also offered advice on site and once certain of our plan, we got cracking! We ended up digging three 40m trenches, each 2m wide and 1.5m deep at 4m centres. We also imported 35 tonnes of sand to cover the pipe below and above to avoid the possiblity of damage from sharp rocks when backfilling and to ensure good contact with the ground. Bfore covering and backfilling, the pipe was pressure tsted and to finish off, fed into the house via the 'slow bend' duct pipes already built in to the floor slab.
Turning Chillier part two
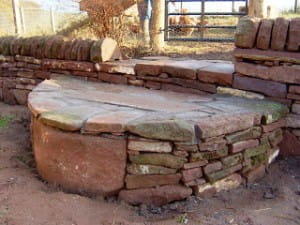
A continuation of the previous blog - the technology sometimes prevents such things. The step shown left was finished on Friday. The stone for the whole wall and the step has been recovered from the demolished farmhouse save for the coping stones which have been bought from a nearby farm where the wall had fallen down. The weather forecast for later in the week is distinctly cooler with daytime temps nearer zero and we have had our first conversations around the subject of 'how long can we/will we stay in the caravan'. No decisions to move out yet as most of the time its really not difficult. Naturally we would prefer more space and a lovely big bathroom but that is, quite literally, a work in progress. The office is in an old toolhouse adjacent to the barn which adjoins the house and with its high level of insulation it is a very pleasant place. Steve has been insulating the water pipes within the caravan and we need to tackle the ones outside where they are not underground.
Turning Chillier
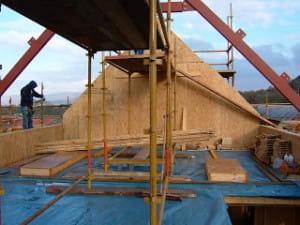 As Steve's previous blog mentions the first floor is in place and in response to Jane's query on keeping the water out you can see the blue sheeting which is keeping the worst of the rain out. Even so I don't think we're getting as much rain as usual for this time of year .....famous last words?!
The builder has lined up the slaters to do the roof in early December which is terrific news if all goes to plan. The 'hooded man' in the photo is Davie the joiner. Today he and his 2 lads attached all the rafter shoes to the ridge beam. I spent 15 mins at the top of the scaffolding before deciding it was too chilly and retired to the office which is lovely and toasty. It is terrific seeing the room formations and the height of the ground floor rooms.
Our friend Alan finished the wall late last week with the final stretch of coping stones and a rather fab step up to the chicken's enclosure. He found a curved piece of red sandstone from the demolished house and has utilised it in the step.
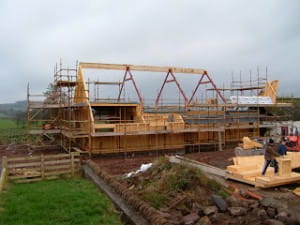
By close of play last Friday - 2hrs after this photo was taken - the ridge beam and both gable walls were complete. During the couple of days prior to this, by quirk of structural engineering design the first floor boarding was glued and nailed in place, the idea being to provide a strong joint between the 1st floor I-beam joists and the binder plate (a deep beam which runs along the top of the ground floor wall panels against which the ends of the joists are butted).
In my (and our joiner's!) view this was quite an unusual detail, but a call to our stuctural engineer - "just to make sure..." - clarified the thinking behind it. The downside was that the T&G chipboard flooring had to be protected from the weather until the building is made watertight, as being merely 'moisture resistant' isn't exactly a qualification for survivablity for up to a month's battering by the west of Scotland's climate in November!This coming week should see the completon of the 1st floor wall panels and start of work on the roof. On the 'goods inwards' front, the windows are due to be delivered this week and possibly the Pavatherm wood fibre insulating cladding board.
Ridge beams...

With the three portal frames now in place (which, by the way, fitted perfectly!) the end of last week saw the the central ridge beams lifted in place to tie the portals together at their apex and of course form the centreline of the roof against which will be fixed the rafters.
The ridge beams is made from mltiple bonded laminations of wood ('glu-lam') and is as strong as it looks! It's nice to see the height of the house now and easier to imagine how the 1st floor rooms will look.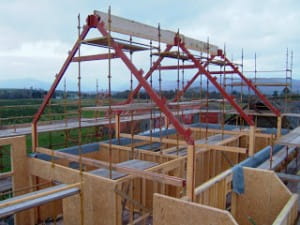
This coming week work will start on installing the first floor joists, 1st floor walls and gables, so things should really start to take shape soon. Last but not least, a letter came though from the Enery Savings Trust at the weekend with the grant offer for the heat pump, which in Scotland is 30% of capaital cost up to a maximum of £4k; every little helps!
Search and book
Tags
animals architectural design awards, cottages, sustainability bees caravan cottages Curlew Cottage days out design dogs eastcambusmoon electric vehicles foundation fruit and veg production furniture gold award great review green toursim hard landscaping heat pump heat recovery hens holiday accommodation insulation interiors lambing landscaping loch lomond low energy measures national park nature outings owls people photoshoot roof solar PV timber frame Training ventilation walks website windows
Blog archive
- June 2019 (1 entry)
- February 2019 (1 entry)
- December 2018 (1 entry)
- November 2018 (1 entry)
- April 2018 (1 entry)
- December 2017 (1 entry)
- October 2017 (2 entries)
- June 2017 (1 entry)
- April 2017 (2 entries)
- March 2017 (1 entry)
- February 2017 (1 entry)
- February 2016 (1 entry)
- June 2014 (1 entry)
- June 2013 (1 entry)
- April 2013 (1 entry)
- February 2013 (1 entry)
- May 2012 (2 entries)
- April 2012 (1 entry)
- March 2012 (2 entries)
- December 2011 (1 entry)
- August 2011 (2 entries)
- June 2011 (4 entries)
- May 2011 (4 entries)
- April 2011 (1 entry)
- December 2010 (4 entries)
- October 2010 (2 entries)
- August 2010 (2 entries)
- December 2009 (1 entry)
- November 2009 (2 entries)
- October 2009 (2 entries)
- September 2009 (3 entries)
- August 2009 (1 entry)
- July 2009 (2 entries)
- June 2009 (3 entries)
- May 2009 (7 entries)
- April 2009 (2 entries)
- March 2009 (2 entries)
- February 2009 (1 entry)
- January 2009 (4 entries)
- December 2008 (2 entries)
- November 2008 (1 entry)
- June 2008 (5 entries)
- May 2008 (4 entries)
- April 2008 (11 entries)
- March 2008 (14 entries)
- February 2008 (9 entries)
- January 2008 (12 entries)
- December 2007 (11 entries)
- November 2007 (11 entries)
- October 2007 (10 entries)
- September 2007 (6 entries)
